|
Basics
|
|
The editor lets you create new worlds for The Quest. These worlds can be uploaded to the Steam Workshop where every Steam player can find and play them. You can even sell
worlds (after they have been approved). See more about this in the "Uploading to the Workshop" part.
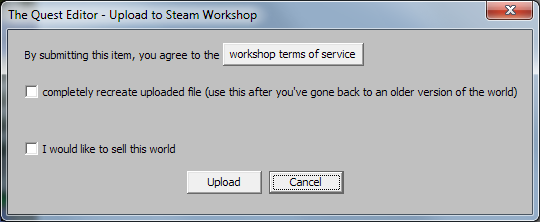
A world for the game is a complete new set of maps which the player can go to and have adventures in. You can add new graphics, items, monsters, NPCs, quests, etc., and you can also use any existing asset from the main game. You cannot change existing things, however. Attributes, skills, in game races and the way the game plays are also unchangeable. The editor is available on Windows. You can start it from the game (Additional Worlds/Editor button). Once started, you can create a shortcut on the desktop (Misc/Create desktop shortcut). If you'd like to create a shortcut somewhere else or start the editor in some other way, the executable is located in the same folder where the game is. (You can find where it is by right clicking the name of the game on your Library screen in Steam, selecting "Properties", then the "Local Files" tab and then the "Browse Local Files..." button.) Please note that for Workshop integration to work as far as Steam is concerned, the editor is the game. This means that you can't run the editor and the game at the same time. To upload worlds to the Workshop, Steam must be running. If your computer has 4GB (or less) memory, it's best if you exit anything you can so that only Steam and the editor runs. If Steam is running when you use the editor, the Steam overlay will also be injected into the editor. It's usually not a problem, but if you find it troublesome, you can disable it from the game's "Properties/General" tab ("Enable the Steam overlay while in-game"). (The Steam overlay cannot be disabled programmatically (by the editor).) The Quest is not a new game. It was first released in 2006, initially for handhelds with very limited processing power and memory. The game and editor has been updated and fixed extensively since then but limitations and peculiarities remain. Some information on the editor and on how The Quest works is available from the original programmer: There is also a forum available, where you can talk to other editor users (and players): Most of the editor should be self explanatory and you are encouraged to try things out freely. Please note, however, that in many cases you can delete things even if they are are still being used (for example palettes). This can lead to crashes. If you'd like to delete things, make sure they are not being used. It's also a very good idea to save frequently (File/Save (Ctrl+S)). Creating multiple versions of the world you're working on can also be useful. For example, if the world is named "Vacation", create numbered versions (like "Vacation1", "Vacation2", etc.) occasionally, keeping all files. For example, if you change a dungeon extensively and realize that you don't like those changes, you can go back to a version from before you started the changes. (NOTE: If you go back to an earlier version, it's very important to recreate the exported ".pak" file when exporting or uploading. Otherwise some or all parts of the exported/uploaded file might not get rewritten. Use the appropriate checkbox when exporting or uploading.) |
|
Creating a world
|
|
In the tutorial I'll go over creating a new world for the game from scratch. I won't detail every step but I'll try to highlight anything interesting. You can inspect every finished
detail by loading the world file in the editor. (If you are reading the tutorial in the Steam Client, please right click the link, select "Copy Link Address" and paste the link into a
browser to download it.)
You can also look up how things are done in the main Quest world! Here is the file. (Please note that this file is not for editing, but only for studying.)
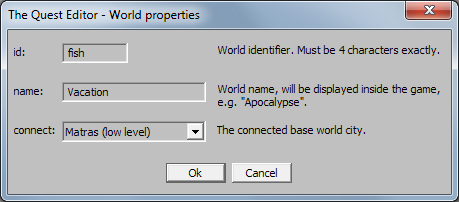
Let's start by creating a new world (File/New).
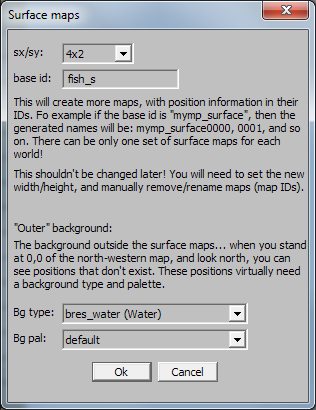
When you create a new world, you'll get a new empty dungeon map and nothing else. You can create worlds without surface maps but expansion worlds usually do contain them. Lets create them (Map/Create Surface Maps).
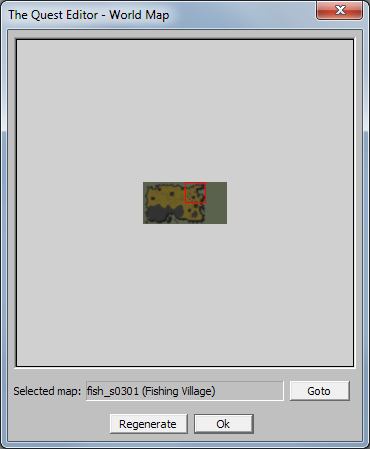
As you can see, all maps must have a unique id (surface maps will have ids like "fish_s0101", "fish_s0102" etc.). This is true of everything. However, different kinds of things (like items or quests) can have the same id, ids must only be unique within a kind. There is only one exception, images and sounds cannot have the same id. Usually you'll not have to think about it, just give things an id you like, the editor will tell you if the id is already in use. When adding external files like images or sounds, the editor will also suggest an id. Let's finish up the surface maps. We'll select "bres_water" as the background type (because the world will be a small island). You can use everything from the base game (this includes things with "bres" and "base" id). After you have created the surface maps you'll find yourself in the top left map, which is all empty sea. |
|
Maps
|
|
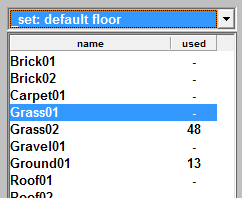
Blocks in The Quest have the following structure. First, there is the floor. It has a default image (texture) for the whole map. You can put two extra layers on top with different images.
You use the "[Floor] Floor" menu to select what to put on the first layer and the "[Floor] Road" menu to select the image for the second layer. You can change the default image with
the "_set: default floor" menu. You can put extra "decoration" on top of these three layers with the "[Floor] Floor decoration" menu. On top of the floor comes either walls or objects
(like trees, monsters, etc.). A wall completely fills a block. You can put down walls with the "[Wall] wall" menu. There are actually two levels where you can put walls. The ground level
and the "high" level. This way you can create taller structures. You can also change the "floor" of the high level (this will be the ceiling of the ground level) and put most of the
objects you can put on the ground level on the high level too. To select which level you work on, click the appropriate button after the "Level:" text in the main window.
One large part of creating maps for The Quest is placing all the objects (walls, trees, etc.). The other large part is defining their functions by setting their properties and adding scripts. A lot of the properties are self evident, but I'll return to this part later. I'll use a "trick" for the surface maps of the tutorial. For the first 3x2 maps, I'll change the default floor to "Grass01".
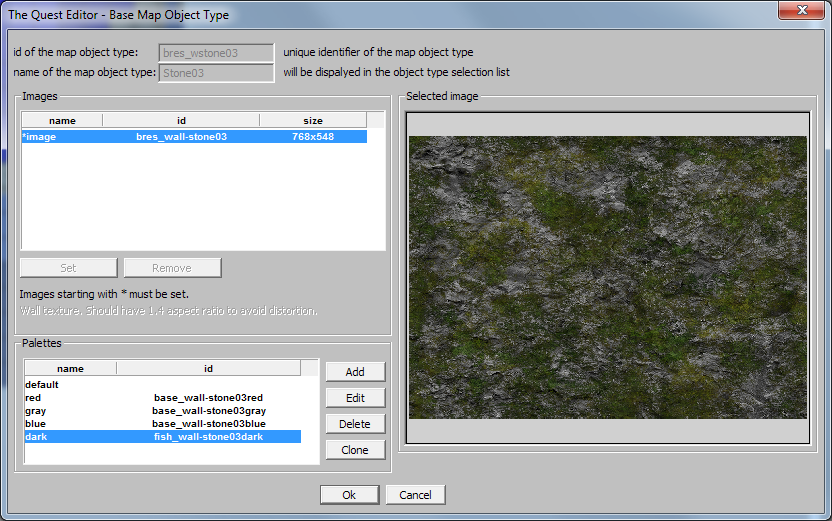
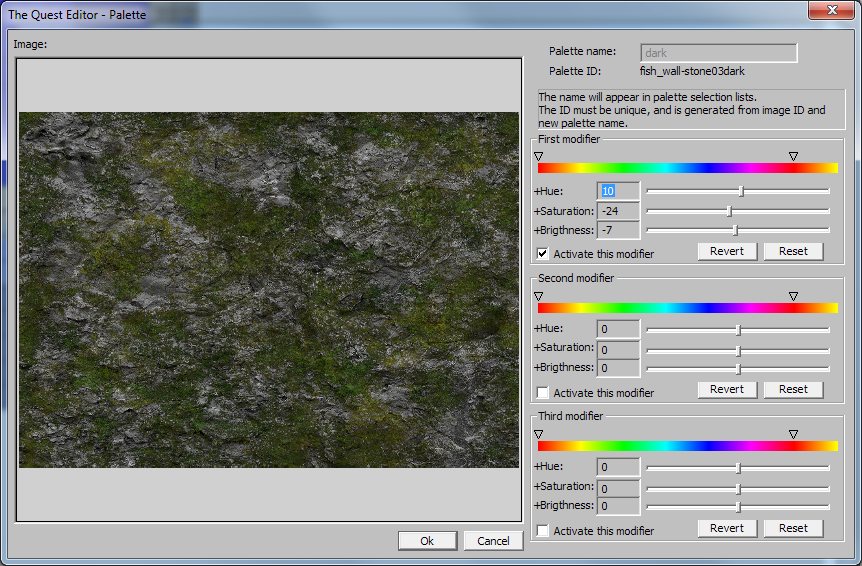
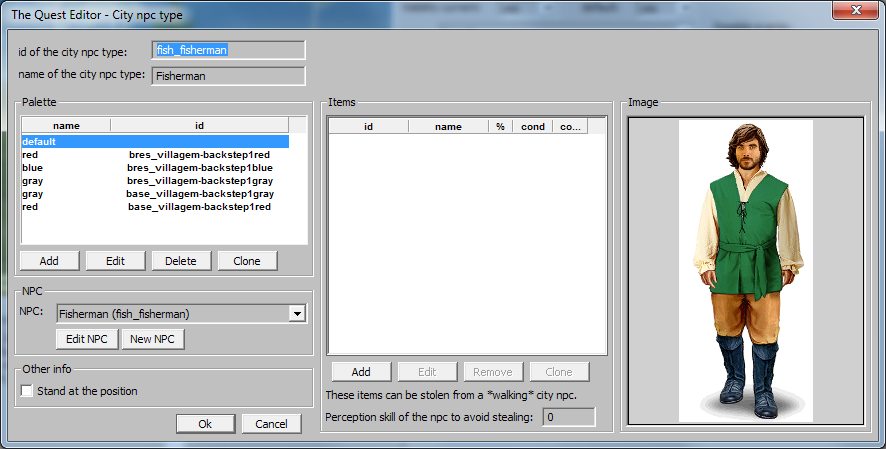
In the tutorial world, I'll put a village in the top right map of the island and a mound in the bottom right. I want to leave the two top left maps as grass/forest. I'll not really use the two bottom left maps. So I'll add hills to them to add ambience. This can be done with the "[Block] lonely roof (w/o a wall)" menu. First I created the "skeleton" of the hills with walls (using a rock texture). Then we can add slopes with the aforementioned "roof" objects. The editor/game will auto-select which concrete 3d model to show for each block. You can influence the shape by placing roof objects appropriately. If you don't want unsightly gaps, this will constrain your placement. Look at the completed world in the editor to see the possibilities. I've used the "Stone07" image for the slopes. If you try to select a similar looking texture for the walls, you'll find that there is no good match. The "Stone03" image seems good, but it's too bright. Let's create a new palette for it! There is a shortcut for the editing window in the form of the "Edit type" button. When you open the editing window, you'll find that most things cannot be changed, because this is a base resource wall type. However, we can add new palettes for base resources too! I've named the palette "dark".
After adding the hills, I've also added a "mound" in the bottom right surface map the same way. This will be the entrance to the crypt of the evil warlock, who is the main interest in the world. Next I've added trees, bushes and flowers/mushrooms on lots of blocks to create a forested look. I've also added darker patches of grass and ground as extra floor layers here and there. You can add add "foresty" stuff using the "[Forest] ..." menus. There is also a special "[Group] group of objects" menu. With this you can add more than one of the same thing to a block. To change how many are added, use the "Density" option. Placement will be random. To guide the player, I've left the way I'd like them to go mostly empty and also added roads. These are quite patchy, because this is not a well developed place. To finish the main features on the map, I've created a small village. This involves two things. The first is putting in houses, using the walls and roofs. The second is putting decorations on the houses. Doors and windows count as "decorations" in this case. Until know I put things on blocks. A lot of things can only be put on walls. This not only includes things which obviously go on walls, like doors, but things which go beside walls too, like barrels. Everything in the "[City] city door", "[City] city sign", "[City] city window", "[Item] container", "[Item] shelf", "[Npc] npc/wall", "[Switch] secret switch", "[Wall] wall decor" and "[Wall] wall line" menus goes on a wall. The "[Switch] lever" menu is also special. The floor switch goes on the floor but "Lever02" goes on walls. To place things on walls, use SHIFT + click to select one of the four sides of a block. (You might need a little practice at first. :)
After I've added everything to the surface maps, I've named them. This can be done in the "Map/Map Properties" dialog. Maps must have different ids but they can have the same name. (There is no need to name every empty water map differently. I've named them "Sea".) You can select different surface maps either by moving outside their boundaries, in which case the neighboring map will be selected, or you can click on the buttons beside the "Surface:" text in the main window.
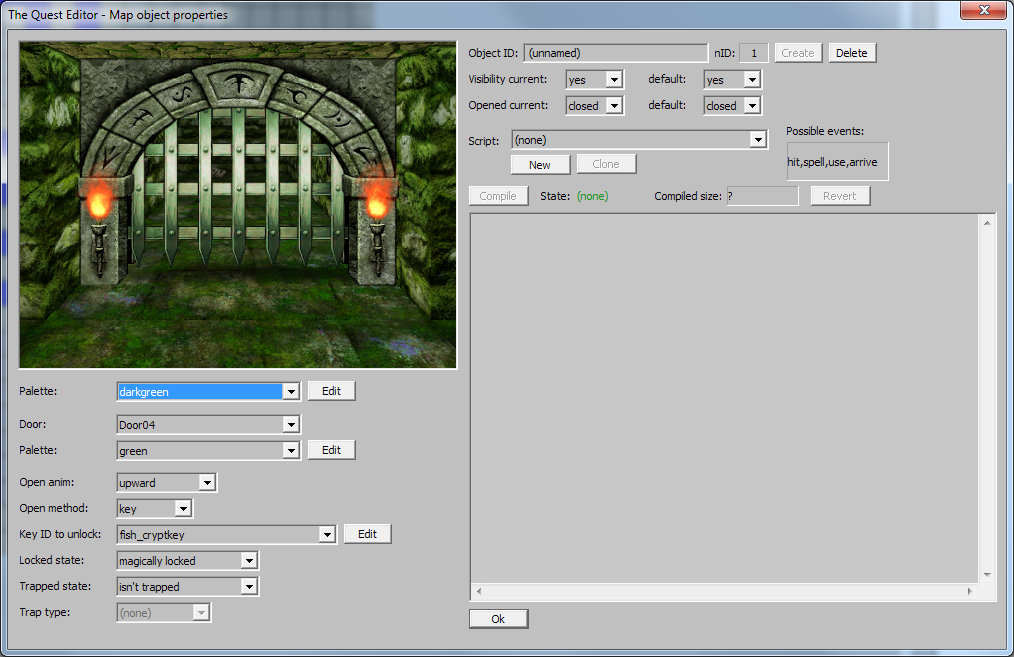
Time to create the dungeons. One dungeon map already exists ("fish_newmap"). First rename it to something more descriptive. We'll also rename the id. It'll be the home of our evil warlock, so we'll name it "Crypt" and it's id will be "fish_crypt". I'll not only change the default floor, but the ceiling too. This can be done in the "_set: ceiling" menu. This only works in dungeon maps. This sets the second level ceiling. The first level ceiling is actually the "floor" of the second level and will use the default floor image when we place a wall on the second level. This means we have to replace the ceiling on each block where we don't want the default floor as ceiling. Placing walls should be familiar by now. There a few new things though. I've used doors. These can be found in the "[Block] dungeon door" menu. There is a sufficient "darkgreen" palette already for the door frames, but I've added a "green" palette for the portcullis.
The stair leads to another level of the crypt. We can create it with the "Map/New Map" menu option. You don't have to worry about lining up the stairway on this map and the stairway on the main crypt level. Moving between levels is handled by using objects with ids and those objects can be anywhere. Crypt Level 2 is a small map with only the sphere in the back the only new thing. (We also need a new map for the inn's interior.) |


|
People, monsters and other things
|
|
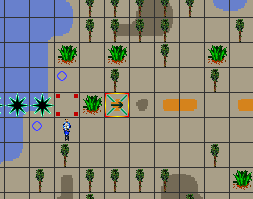
After creating the maps, it's time to populate them. First let's place the point where you arrive into the expansion.
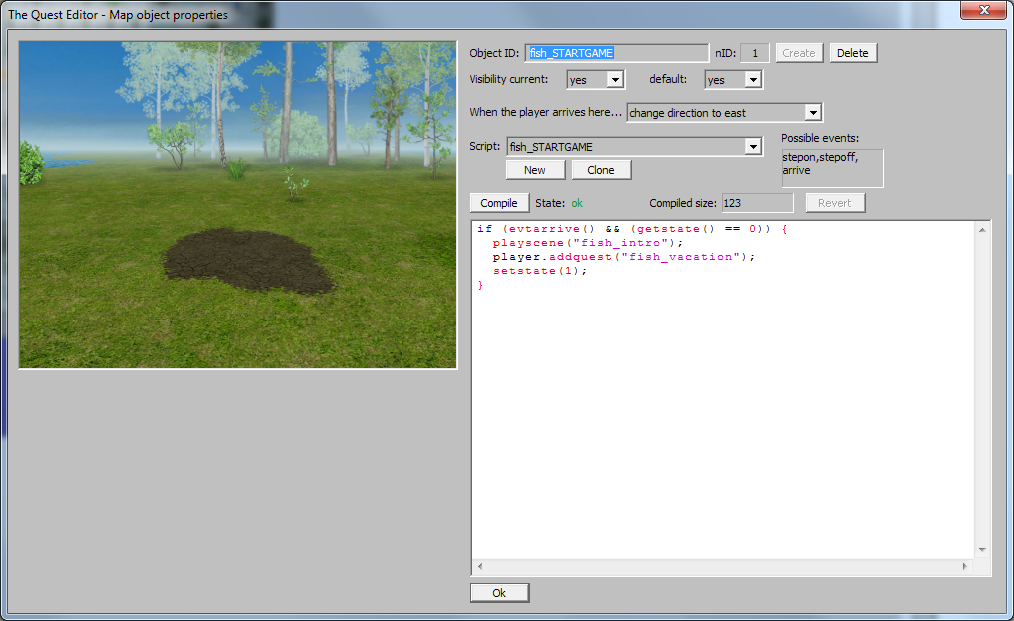
This will be a specially named object, called "fish_STARTGAME". This can be any object, but usually it's best to actually place a position for it. A "position" is something which doesn't
have an associated graphical representation, but can be placed in a block like other things (it's in the "[Position] position" menu). After placement, we can edit it. It already has an
object, but it's unnamed. Let's rename it to "fish_STARTGAME" and set the direction to east. We'll be adding the script later.
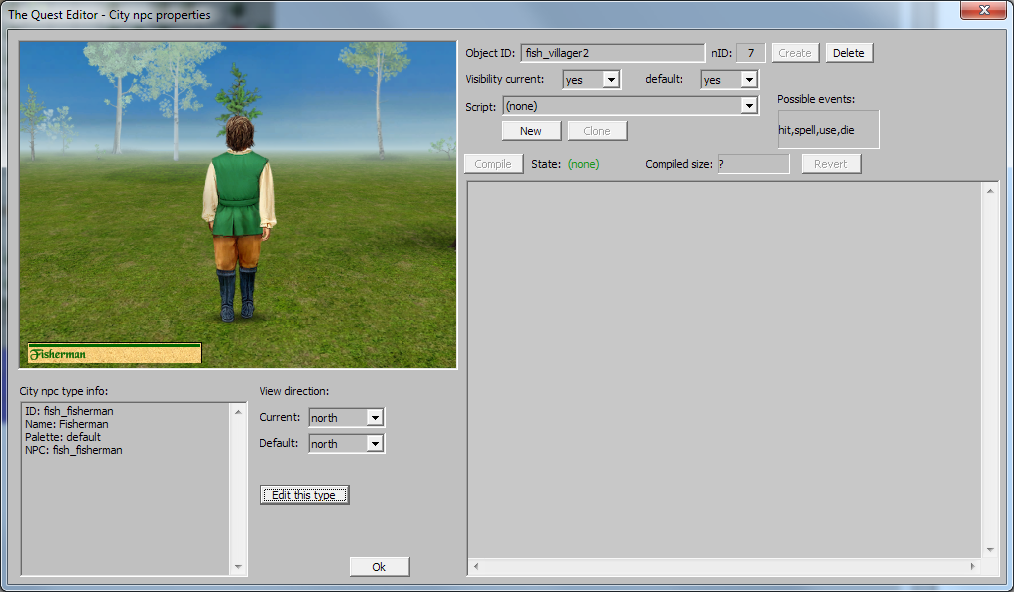
The story is that you are on a vacation and you'd like to rent a fishing boat so you've come to this small island with a fishing village. However, as you get near the village you discover that all the villagers are wandering about outside, frightened. As it turns out an evil warlock was disturbed in its crypt nearby, turned the innkeeper into a ghost and chased the villagers out. The real reason the warlock got up and about is the village alchemist who stole a book from the crypt. Your quest on the island is to solve the warlock problem. There are three possible ways to do it. The best is to find out all you can and pressure the alchemist into admitting what he has done. He'll then give you the stolen book which you can put back into the crypt. The warlock will be pleased and you can go back to the happy villagers. If you don't get the book or don't put it back, you can still get the good ending, by exploring the crypt and destroying his power sphere before confronting the warlock. In that case he'll try to curse you and the villagers but will fail. After you've killed him, you can go back to the happy ending. If you confront the warlock without either putting back the book or destroying the sphere, he'll curse you (making the fight harder) and the villagers, turning them into ghosts. You must then kill them too to finish your adventures on the island. In either case, after you've done everything, you'll find that the ship captain who brought you here has returned and you can leave the island. To simulate the different phases of the quest, we'll add all possible people/monsters but hide those who are not relevant at first. To create monsters/people we'll need a few different things. First, in The Quest monsters/people roaming about and people who you can talk to are different things. To place "monsters" (including people) we can use the "[Monster] ..." and "[Npc] ..." menus. These can be created in the "World/Manage Monster Types" dialog. All monster types have a "base monster type" (which can be created in the World/Advanced/Manage Base Monster Type" dialog). Characters you can talk to can be created in the "World/Manage NPC Types" dialog. You can connect an npc to any monster type (which is placed on the map), but you don't have to. If you create a monster type without an npc, you'll not be able to talk to it. But for a real monster it's usually not needed, you'll set it as aggressive and the player can fight it. You can also connect an npc to a door, for example. In that case it'll not have a body in the world but you can still talk to it. So, lets place people. In the glade west of the village, I placed a few wandering villagers, men, women and children. For this I've created three npcs and three "monster" types (based on the appropriate villager base monster type). There are more than three villagers ambling about, but all the men, all the women and all the children can be the same "person" (npc), because all they do is provide some information. To see what they do, let's edit one of them (Edit button on the main window). First note that all of them have a named object. By default, freshly placed monsters don't have one, so I've created one for each using this dialog and named them.
One of the fisherman is the Elder Fisherman. He has his own quest, so he has his own monster type and npc. He also stands in place near the center of the map, to be easy to be found. You can ask him the same question you can ask the other people around, however, instead of answering, he'll give you a quest. You can create quests in the "World/Manage quests" dialog. |
|
Scripting
|
|
It's time we take a look at scripting. Scripts can run in three different places in the game.
First, they can run after every response (speech) an npc gives. They can be edited in the dialog editor window. These are frequently used to keep track of quest states or give to or take
from the player some item (or money).
The Quest uses its own script. It looks and behaves like C, with some (large) differences. The basic syntax is the same. You write statements terminated by the semicolon ( ';').
You can have variables, can call functions, use operators and the if statement to select between alternatives. However, there is no looping (for, while,
etc.), or case statements. You cannot define your own functions and cannot call other scripts. There are no explicit data types and you don't need to declare variables,
you can just assign a value to a name and that will automatically create a local variable. There are two implicit data types, integer and string. Integers are the usual 32 bit integers.
Strings can only contain ASCII characters. (There is no character type.) Any variable can hold both integer and string values. (And they are converted to each other automatically.) There
is no memory management (it's not needed, all variables are either local or global and they can only hold values not references or pointers). There are lots of built in functions to
use (see The Quest System PDF). There is no boolean type either, 0 is treated as false and everything else as true.
One large difference from C is that there are 'objects' on which you can call functions just like in C++. I've talked about them a few paragraphs back. It can be a little confusing, because there are different 'objects' which you can place on the map (for example walls, trees, etc. these are all called 'map objects') and there is the special 'object' which can be attached to 'map objects', monsters, etc. This 'object' is basically a struct from C, with data members. As I've written, it holds some state (on/off, visible/invisible and a state variable which starts out as 0). To access this object from scripts, you write its id. For example: fish_torch.seton(); There are many functions which can only be called on an
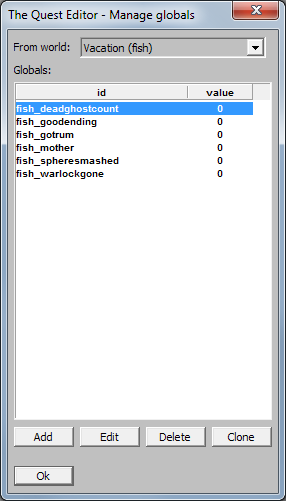
object. Apart from objects in the world there are globals, which are simple variables which have an id and a special object, which represents the player (player, for example
player.addquest("fish_quest");). Globals can be created in the "World/Manage Globals" window. By default their initial value is 0, but you can also change it there.
setstate(1);, which will be interpreted as npc_id.setstate(1);
Generally you can refer to objects not yet created while you write scripts, but it's best to create all objects (and globals) before referring to them. There are some peculiarities (limitations) to the quest script on top of the already mentioned ones.
1 (setstate(1);).
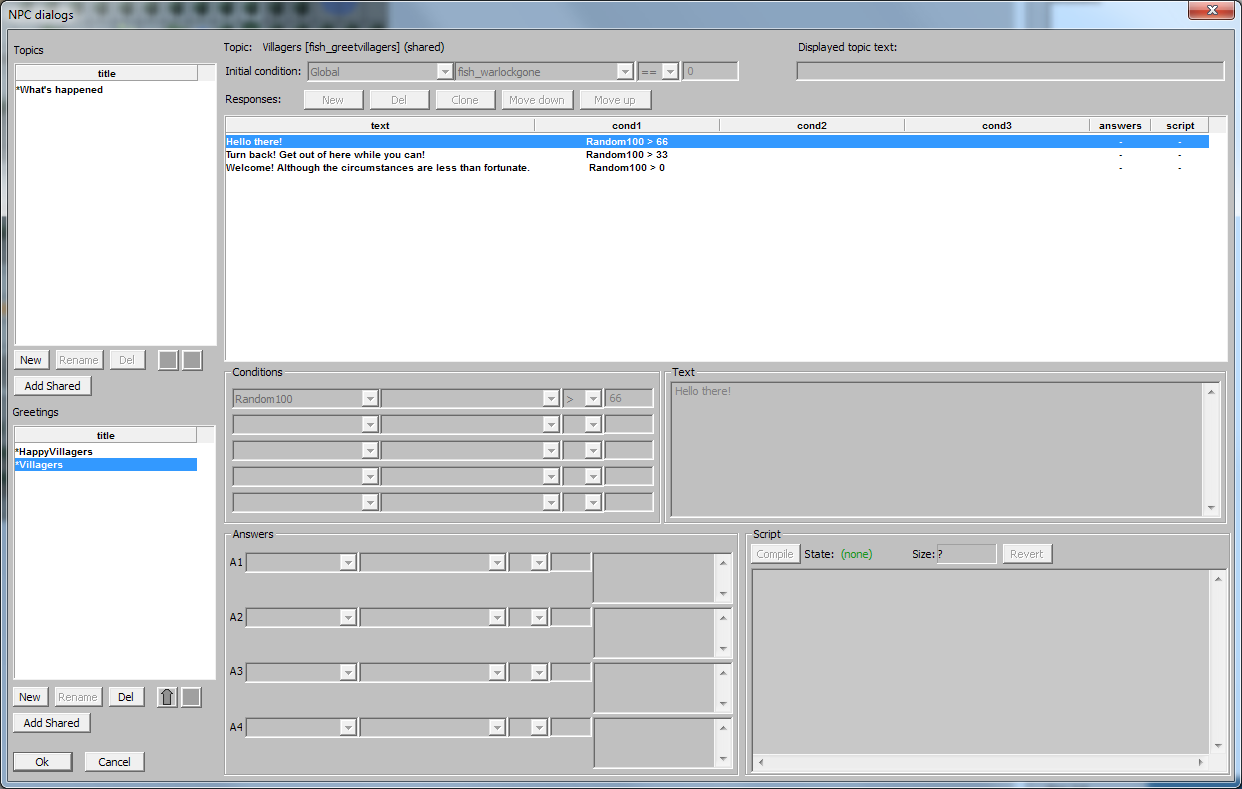
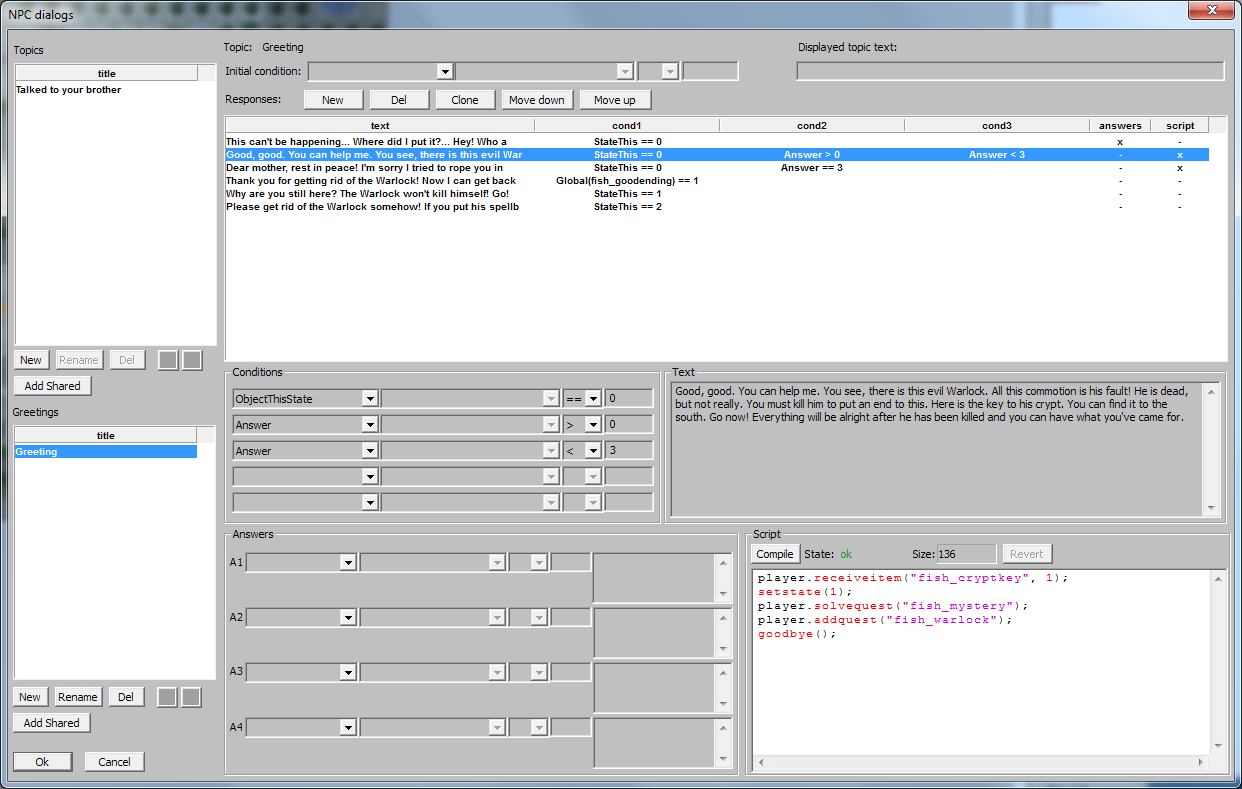
This is a very common way to keep track of the progression of a quest (or anything else). You can notice that the player can only ask this question if the state is 0 (the initial
condition is "ObjectThisState == 0"), which is the default. After we have asked the question and got the quest, we would like the elder fisherman to react differently. In the greetings section
we can see that the "Waiting" topic has "ObjectThisState == 1" as its condition. Which is exactly what we want. After we were given the quest (and the state was set to 1), the elder
fisherman will remind us to get him some rum. If we get the rum, we can give it to him. The "Got rum" topic will be selectable, because the "PCHasItem base_prumhm > 0" condition will be satisfied.
However, you can see that not only the topic has a condition but the response itself has another, "ObjectThisState == 1". Why do we need the later one? If we didn't have it, the player could give
some rum (if they happened to have some) even without getting the quest! If everything is okay, the quest can advance. We remove the rum from the player (notice that we remove 2 bottles, the
fisherman asked only for one, but will take two if he can :), but one is enough, the function will succeed even then). We set the quest as solved and we advance the state to 2. This
way when we talk to the elder fisherman again, he can react properly ("Content" greeting). We also set a global so we can check when talking to the alchemist if we have completed this quest. This
is not strictly necessary, we can actually check if the given quest is completed or we could check if the elder fisherman's state is 2, because that also indicates that we have
completed his quest. How you solve this comes down to convenience or personal preference.
Now on to the other half of this quest. I've created an innkeeper npc and an innkeeper "monster". I've connected the npc to the monster type and put an instance of it into the inn map. I've also created (and named) an object for this monster to keep track of its state. The topic to get some rum from him is called "Rum". The only response has the condition "PCQuestReceived fish_rum > 0", which means it'll only be displayed if the player has gotten this quest (remember anything not 0 is treated as true). This is necessary but not enough. I've also added another check
"Global fish_gotrum == 0". After we've gotten our rum, we'll set this global to 1. Without this check, we could ask the innkeeper for more rum any time.
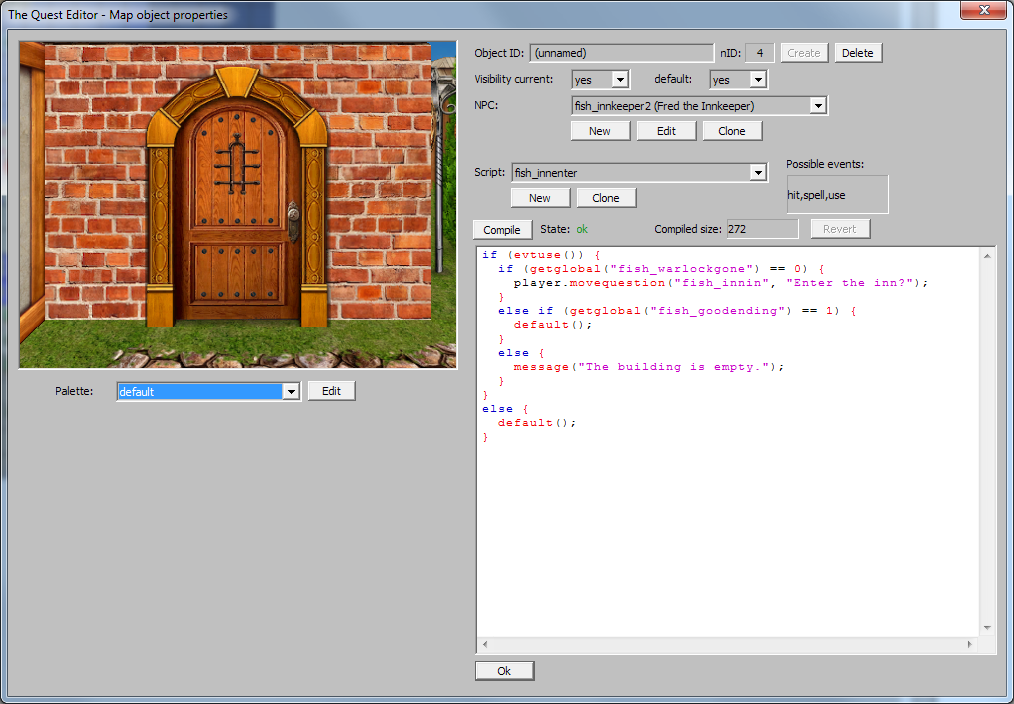
The script on the inn's door is also interesting.
if (evtuse())). If the warlock hasn't been dispatched yet, we ask the player if they want to enter the inn (where the innkeeper
ghost is). Else, if the player achieved the good ending, we do the "default" thing (default();). Every map object/monster will do something default on the different events.
These are the expected ones, a monster will be damaged on a hit or in this case using the door will start a dialog with the npc set on this door ("fish_innkeeper2"). The "fish_innkeeper2" npc
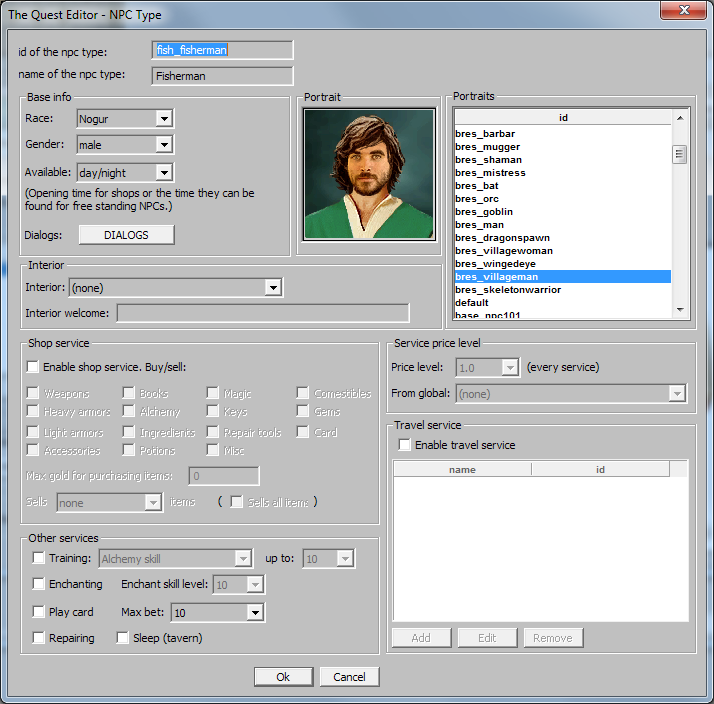
is the "normal" innkeeper who has been (mysteriously) turned back into human. We could have used the ghost innkeeper npc for this, by carefully adding conditions to all of
its greetings, other topics and responses, to differentiate between his ghost and human state. However, it's much easier to just create another npc for this separate use. And we can use
a different portrait too! This is another frequently used method when creating complex quests.
There is one last else part in the code for the use event. If the warlock is gone, but the player hasn't got the good ending, that can only mean that he got the "bad" ending.
In that case the warlock has cursed the whole village and we had to put them down as ghosts. In this case the building will be empty.
Astute observers can note that I haven't talked about yet another else branch with a default(); in it. This will be executed when the script is being run in
response to something which is not a "use". Why is this needed? I don't know. :) However, the code won't work without it.
At this point a small explanation is required. When we first created The Quest, I (Elendil) was only responsible for the graphics engine. The majority of the code, including the game systems and scripting were created by Stewe. He, however, has left us a long time ago. Since that time I've fixed countless bugs, added and modified things and ported the game to lots of platforms (iOS, Steam, Mac, Android). Still, I wouldn't say I understand the game completely. The code is ... convoluted. :) In any case, although The Quest script is not perfect, lots of things can be done with it. Experiment, look up how things are done in either the tutorial world or the main world and if all else fails, ask in the forums! Let's take a look at the dialogs of the alchemist! First, it's using the usual state handling, with separate phases of his quest handled by increasing state values. There is something new here, however. On the very first response, there are answers. When a response is selected and displayed, if there are answers defined for it, they will be displayed after so the player can select one. Answers have their own condition (only one) and they are only displayed if it's true. The "Always" condition (as can be guessed) is always true. After the player selected an answer, the game will continue with the topic, which means it'll check the following responses and select the first for which all conditions are true. This way we can make the alchemist react appropriately to the answer the player selected. (One additional note: the goodbye() function will force the dialog to an end, so no responses will be checked after it.)
To enter a different map, we don't need to create a script, but we can. We have seen that case with the inn entrance. Let's take a look at the crypt entrance! It's the hole in the wall on the south side of the mound on the "Warlock's Mound" map. If we edit this object, we can see that it has a "Target". If we use this object (by clicking on it or moving into it), it'll transport us to its target. If we leave the question empty, this will happen automatically. If not, like here, the game will ask a yes/no question and only transport us when we answer "yes". The "fish_cryptin" object is on the "fish_crypt" map. There are a group of rocks at the south end of the crypt, beside a similar hole. They have the "fish_cryptin" object, so entering the crypt will put us here. As we can see, we can go to any object, not just to positions (like in the case of the inn or the arrival point for the world). The only downside is that we cannot set a direction, but we already set up both maps so that it's not needed. There is another peculiarity with this particular arrival point. It has a script. We would like to light up the torches beside the warlock's book stand when the player puts back the book. However, the torches are lit ("on") by default and the editing window for them doesn't let us turn them off. So we use this script to turn them off, but only when the book hasn't been placed yet. If we don't put back the book, we can still achieve the good ending by destroying the warlock's sphere before talking with him. The sphere is on its own level so we set the stairs on this level to go down there and the stairs on that level to come up here. These use positions as their targets and also set the direction so everything will feel natural. This is the way that map transitions are done usually. The second door on level two of the crypt is magically locked (so it cannot be picked), just like the entrance door inside the crypt on the first level. The key for this door (on level two) is held by one of the Gargoyles. To achieve this, I've create two identical monster types, with one having the key and the other don't (and of course I've placed one instance of each on the map). After we have dispatched the gargoyles and entered the sphere room, we can use any available means to destroy the sphere (the script will run on hit, use or spell use). |
|
Adding new images
|
|
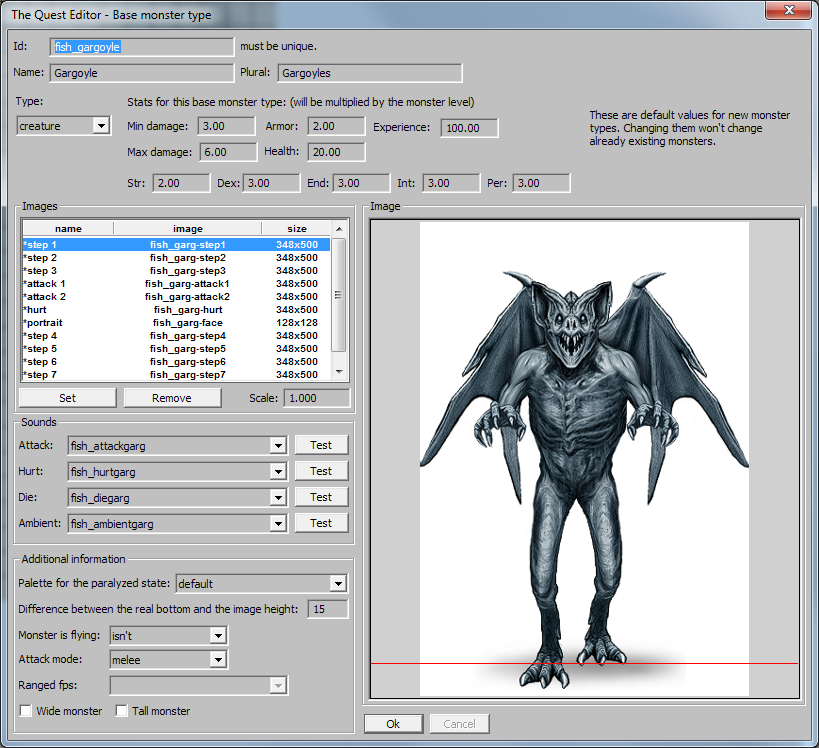
For demonstration purposes, I've created a new base monster type, with its own graphics. The graphics (and sound effects) are from the Islands of Ice and Fire expansion.
A note on the monster walk cycle. Step 1 to 8 constitutes a full walk cycle, however step 7 is the start (the standing frame). Step 8 is when the monster starts to bring its left foot (on the right side of the image) forward and the animation continues with step 1, etc. The idling frames are step 7, then step 1, then step 7 again and then step 5. Creating other new map object types or base item types works similarly. The Quest editor accepts two kinds of images. 24 bit true color BMPs for things which are not transparent (like floor or wall images) and 32 bit true color BMPs with alpha channels for things which are transparent (like monsters, trees or decorations). These should be plain BMPs, without additional metadata (like color space information). Most image manipulation programs by default will create BMPs which have the appropriate format. Apart from this, there is only one requirement: all images must have widths and heights which are divisible by 4 (so the images can be compressed when exported for use by the game). For non-transparent images, if you get BMPs or convert from other formats the resulting files will more than likely work. For transparent images, you might need to do some work. One frequently used format for transparent images is transparent PNGs. The Quest editor cannot use these, but they can be easily converted to 32 bit transparent BMPs. I'll detail here how to convert them using Photoshop. To create correct transparency and prevent color fringes, colors must be propagated to the transparent pixels. There is a freely available Photoshop plugin which can be used for this purpose. It's called "Solidify B". It's available here.
|

|
Finishing up
|
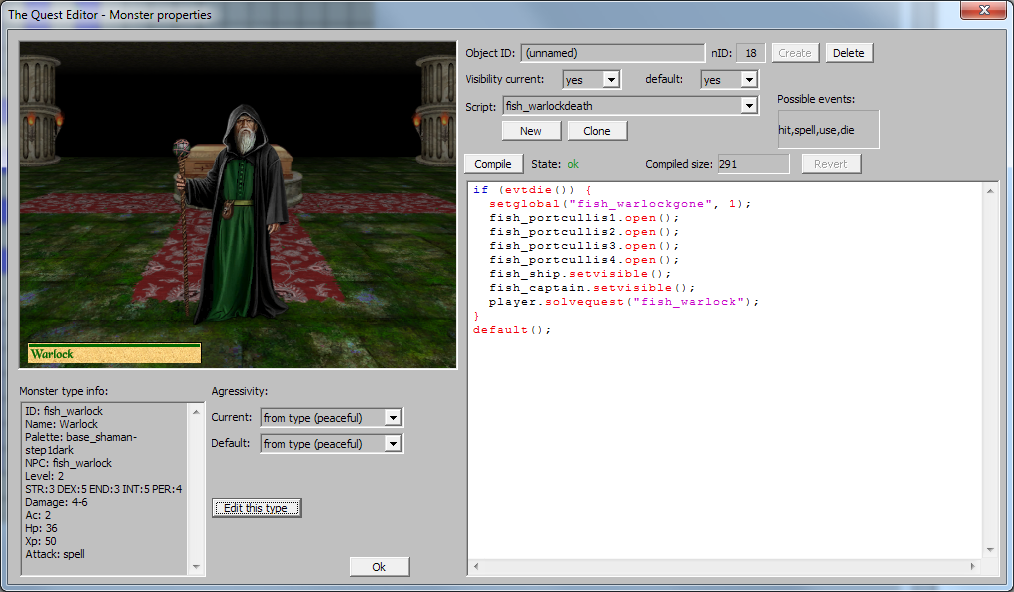
Back to the warlock. He starts out peaceful but can become aggressive so we check for that. (You can talk to aggressive npcs in game.) We also check if the book was put back or the sphere
was smashed so we can select the appropriate response. If he becomes aggressive, he'll close the portcullises (which will be raised when he dies).
In his map object script we must always call the default(); function, otherwise he'll never die. :) Here as well as in his dialog scripts we also hide and show the appropriate npcs/monsters.
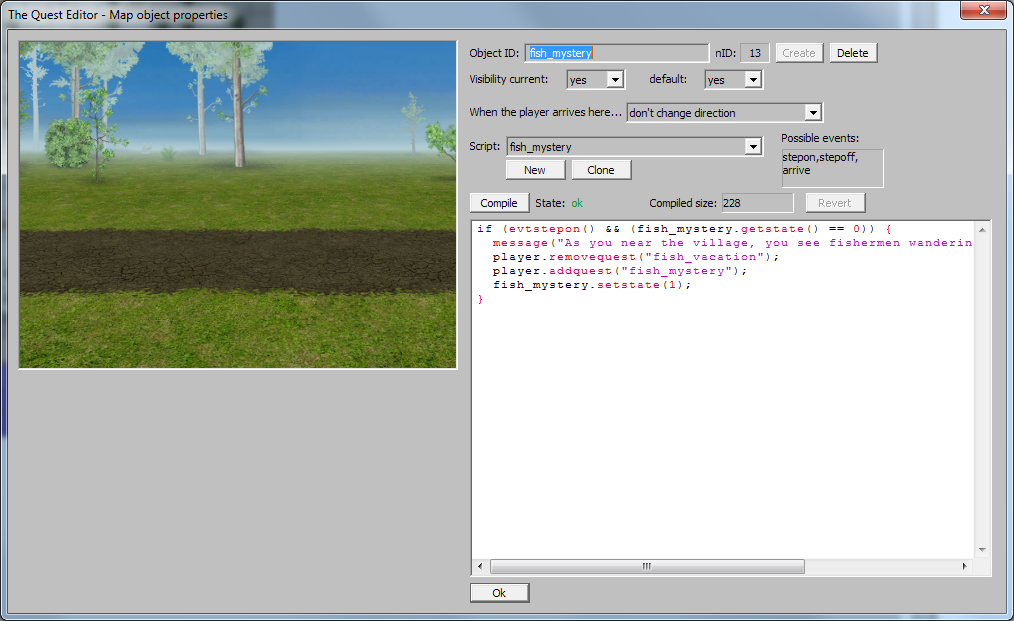
After we solved the warlock problem, we can go back to the village. On the road there we can run a script to get to the final parts of the quest. I've made sure this is the only way to get back to the village so the script will always trigger. I used the usual getstate()/setstate() method to make sure the script runs only once. I've put in
the message(...); function before the cutscene to make sure the player stops. Otherwise the player might continue to move after the cutscene plays, which looks messy.
You might have noticed that on the "Glade" map there are many positions placed with a similar script to move the plot along. I've used all those positions to run the same script no matter where the player enters the map. I could have used the same technique of restricting the map to only have one entrance from the west but I thought it wouldn't look that good. After the script on the road coming back from the warlock has run, the world is close to finished. You either have to kill all the ghosts or you can talk to the grateful villagers. In any case, there is nothing else to do after this than go back to Freymore. The captain (and his ship) has already been made visible so we can talk to him. His script has another special construct. player.movebyship("expback","expback"); will take the player back to the connecting city.
|
|
Testing
|
|
Having completed our world, it's time to test it! This is very important, it's almost guaranteed that you'll not get everything right the first time and you'll need to change and fix things.
To test your world, first select "File/Export for PC/mac". This will create a ".pak" file usable by the game. By default, the editor will export the file into the appropriate folder. (It's
"Documents/The Quest/expansions". If you've exported the world somewhere else, copy the exported file into this folder.) To actually test the world, exit the editor and start the game.
In the case of the tutorial world, after starting a new character and going to Captain Verra we should see a new travel destination, called "Vacation".
Testing is very important, but it can be tricky. When a character is in a world the game saves lots of information about that world. The items collected, monsters killed, etc. This means that it can be problematic to load a save when you've changed the world. The game will load some things from the world and some things from the save file. This can lead to many problems and even to crashes. One particular problem experienced many times by expansion creators happens when they add new shops to an existing world. If a character which was near to the new shop goes there it might happen that all the items in the shop get dumped somewhere on the map. This (and similar things) can be prevented by waiting at least a week (in game time) on a different map. This is because things in the world get reset after one week in game has passed, which clears out the saved data for that map. The best might be to wait somewhere on Freymore, completely outside the new world. Unfortunately some problems are not prevented even by this. To be sure that everything works as intended, the new world must be restarted for a proper testing. This can mean a completely new character for low level worlds but an existing high level character is just as good (for high level worlds), just make sure you (or your testers) load a save which has never been to the new world. |
|
Uploading to the Workshop
|
|
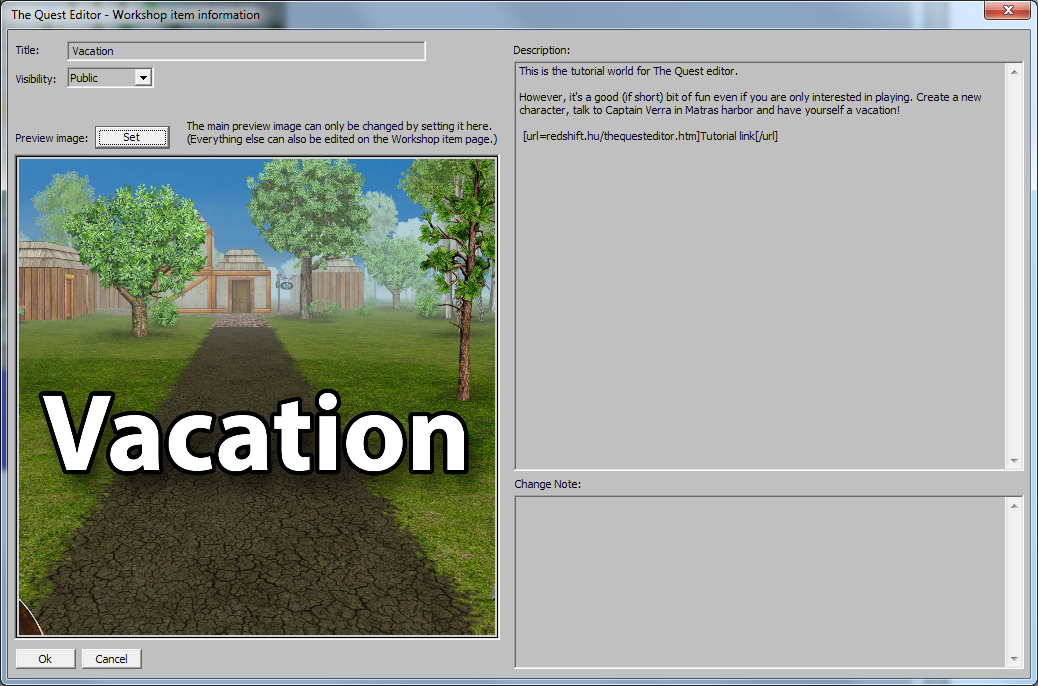
If everything is finished and tested, it's time to upload the world to the Steam Workshop! Just save your world (Ctrl + S) then select the "File / Upload to Steam Workshop" menu item.
Finally, something very important. Please refrain from uploading worlds with objectionable content (overly gross or violent or with sexually explicit images, etc.) or content taken from other copyrighted works (games, books, films, etc.). Problematic worlds will be deleted/hidden and their creators may be banned. If in doubt, please ask on the forums. |